Overview
Our asset creation tab in the admin tool consists of three separate flows that comprise the entire contract set and minting & auction page creation process:- Contract set up
- Metadata configuration / asset creation
- Listing or auction creation
Step by step
Contract set up
- Access the Asset Creation tab in the menu on the left and hit the create new contract button in the top right.

-
Hit the ‘Create New Contract’ button on the next modal to confirm you’ll be the owner on the contract. On the next tab you’ll:
- Input the collection name, symbol, and image along with optional description and external link.
- Choose the token type (ERC-721 or ERC-1155). Only one token type can exist on the NFT smart contract.
- Choose chain
- Optional: enable meta transaction if you plan to enable gasless transactions in the future via Stratus relayers .
- Choose the wallet address for mint and royalty payouts


Token gating
Token gating lets you restrict who can claim or buy from this contract by checking wallet ownership or badges at checkout. Configure it during contract set up so every listing tied to the contract uses the same gating rules.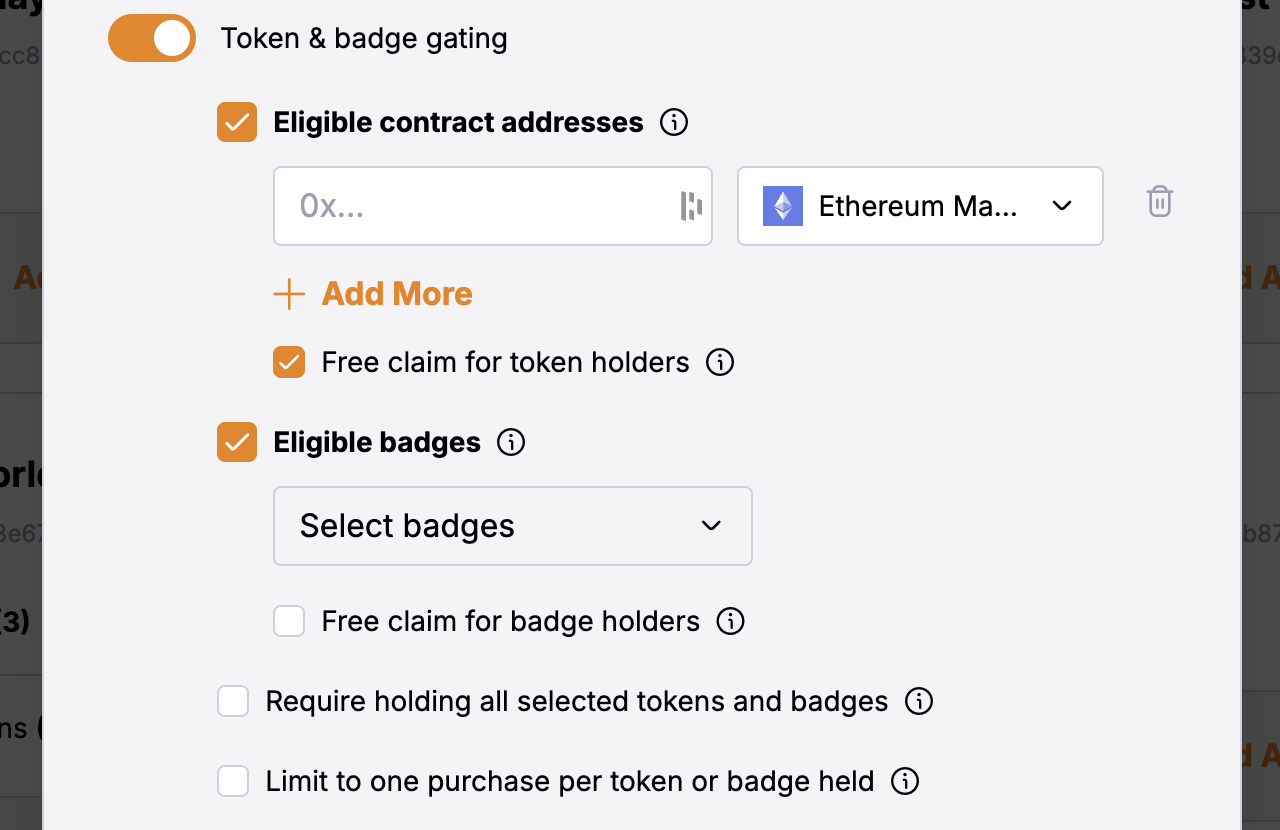
- limit claims to holders of a partner collection
- require a minimum token balance before minting
- unlock drops for badge holders or onchain members
- Free-claim versions are supported by the checkbox under each option. Users can claim for free if they own the required tokens or badges.
- Limit the amount of mints to the number of tokens or badges the user owns.
- Require the user to own all the required tokens or badges. In this case, they will be able to mint only one item.
Add Assets to Contract
- The next step is to configure metadata to the contract as individual assets. We support individual asset creation to start, with .CSV upload and other multi-asset upload capabilities coming soon.
- Add asset name, description, info about the artist, media, and optional trait info
- Optional fields
- Add quantity limit: maximum amount mintable/wallet
- Add minimum: minimum amount to mint/transaction
- Burn to redeem: if you want users to burn the NFT to redeem it. You can add a field they need to fill in, show a blank text or collect shipping details(needs API integration).
- Click ‘Finish’ when you’re done or ‘Duplicate’ / ‘New Asset’ to add more


Listing
- You can now hit ‘List Assets’ on the contract modal in the assets creation tab when ready to either list, create an auction or create a sweepstakes.


List assets for purchase

- Choose the currency you’d like to list in (native currency or loyalty points if enabled)
- Choose the price and the asset you’d like to list
- You can select “free claim”, if you want users to claim for free and pay only gas fees.
- Choose listing duration start and (optional) end time
- You can add a allowlist to the listing to restrict who can claim the asset.
- You can either upload a CSV file with the wallet addresses or add them via the API
- Allowlisted wallets can always claim the asset for free, only paying gas fees.
List assets for auction
- Add an auction name, description, duration, and currency
- Note: Auctions can be tied to one or more than one onchain asset, so please add sufficient description to explain to the user what they’re bidding on
- Choose your auction mechanics:
- Minimum Bid: The minimum amount any bidder can start the auction with
- Minimum Bid Increment: The minimum increase on any bid from the previous highest bid
- Reserve Price: The minimum bid that is valid to win the auction, this is the most important of these three inputs
- Multi-Winner Auctions Only: By default, multi-winner auctions charge each bidder the amount they bid, if ‘Reverse Dutch Auction’ is toggled we’ll instead refund all winners the difference of their bid and the lowest price winning bid
- Blind Auctions Only: If toggled on, users can only see their own bids. All other bids are hidden
- Choose the prize!


List assets for sweepstakes
- Add the sweepstakes name, description, duration, and entry token purchase currency
- Choose the entry ticket and specify the total number of available tickets.
- Choose the prize(s).


- You’re live! View these listings as part of your marketplace!
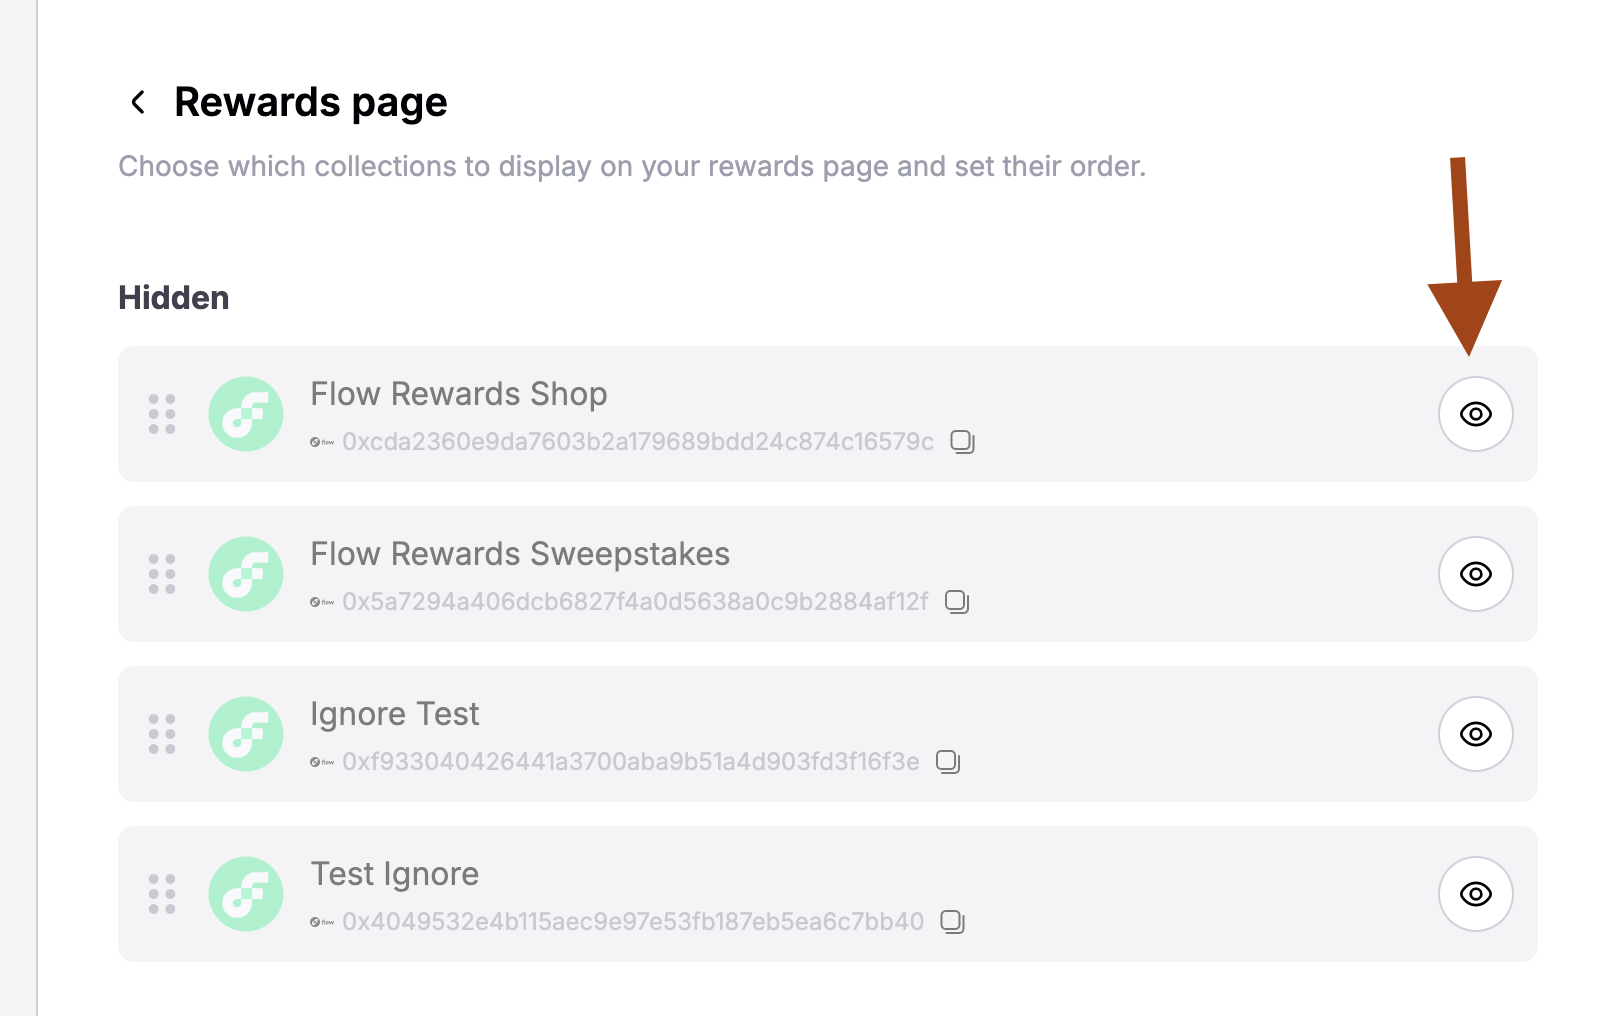
Hide a collection from template pages
To prevent a collection from appearing on template pages (for example, the Loyalty page), you can hide it from the Rewards Shop.- Click the ‘Edit Rewards page’ button in the top right of the Rewards Shop.
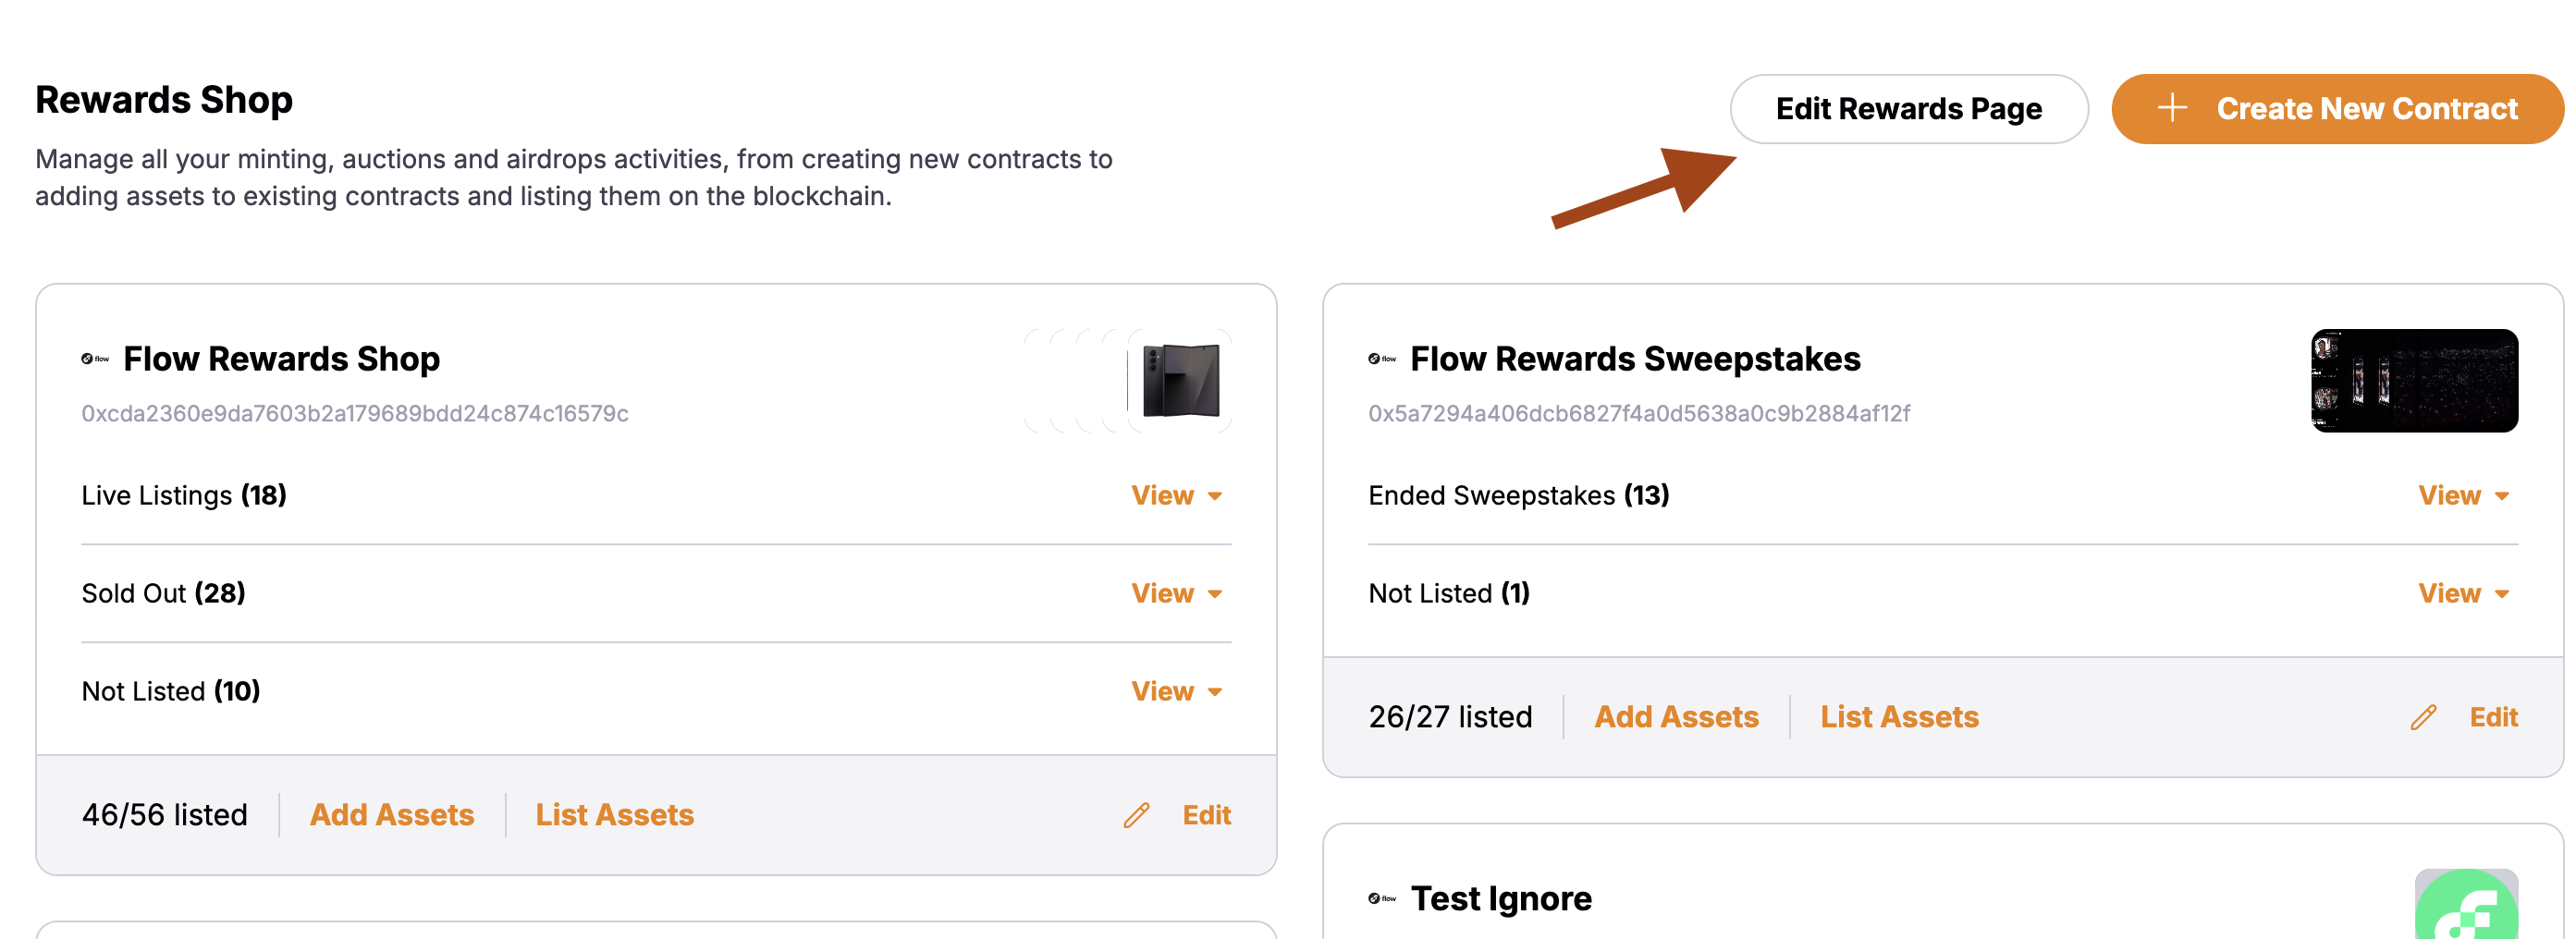
- In the Edit Rewards page settings, use the visibility control to hide or unhide the collection so it does not show on template pages (e.g., Loyalty).
API-based integration
Use the minting API to power a custom checkout or backend-driven flow. This mirrors the same flow used by the Rewards Shop frontend.API requests use the
X-API-KEY header. Use the assetId and contractId
(UUID or onchain address) from the Rewards Shop.Create a mint request
Call The response returns
POST /api/minting/contracts/mint with the assetId, contractId, walletAddress, and quantitymintingContractAssetMintStatusId, which you will poll
for status and signature.Poll for a signature (or relayer tx)
Call
GET /api/minting/status/{id} every 1-2 seconds until a signature is
returned or the status moves to failed.- If
signatureis returned, you need to submit the onchain transaction yourself. - If
relayerTxIdis present, this is a gasless transaction and you can ignore the next step.
Execute the onchain mint
Use the returned signature to execute the mint on the correct chain by
calling the mint function on the contract.
- EVM: call mintWithSignature for ERC-721/1155. If
currencyis an ERC-20 andprice > 0, approveprice * quantitybefore minting. - Solana: execute the base64 transaction using the provided blockhash and last valid block height.
Troubleshooting
NFTs not showing on your frontend (e.g., https://example.com/loyalty)
If some NFTs created in the admin are not visible on your public frontend, walk through the checks below.
These steps apply when your site consumes listings/collections configured in
the admin. If your frontend uses a custom integration, ensure it queries the
same contracts, networks, and listing types you configure here.
Ensure the collection is visible on template pages
Open the Rewards Shop and click ‘Edit Rewards page’ in the top right, then make sure the collection is set to Visible so it can appear on template pages (e.g., Loyalty).
After saving, the collection becomes eligible to render on template-driven pages.
Verify the assets are actually listed and currently active
Creating assets alone will not show them to users. Confirm you used ‘List Assets’ and that:
- The assets are included in the listing (IDs/ranges set correctly)
- The listing start time is in the past and the end time (if any) has not passed
- The listing status is active
Match the page filters and currency type
Template pages may filter by collection, category, or currency. For example, a Loyalty page typically shows listings priced in loyalty points. If you listed in a different currency (e.g., native token), those items may not appear on that page.
Confirm the correct chain/network
Ensure your contract and listings are on the same chain your frontend is reading from. If your site points to a different network (e.g., testnet vs mainnet), listings will not appear.
Still not seeing certain items?
Still not seeing certain items?
- Collection not attached to the page: In ‘Edit Rewards page’, verify the targeted collection is included in the page layout/sections. - Incorrect ID ranges: If you used ranges (e.g., 1-10), make sure all intended IDs fall within those ranges. - Missing media or required metadata: Some templates hide items with incomplete media/fields; confirm each asset has the required fields and media URLs. - Frontend filters: Check user-facing filters (collection, price type, availability) on the site aren’t excluding your items.
Solana Mint Setup & Account Initialization
On Solana, accounts must be initialized on-chain before they can be used in transactions. While initialization instructions can be added to the main transaction, this often increases the transaction size beyond Solana’s limits. Account initialization is required in two main scenarios:- Asset/Token Minting: The asset or token being minted needs an initialized account.
- Payment Receipt: The wallet receiving payment must be initialized for the specific currency (e.g., USDC).
Solutions & UX Considerations
To handle these requirements without hitting transaction size limits, we use the following approaches:-
Pre-mint for Assets: We perform a “pre-mint” operation—a free mint that initializes the account for the asset/token. This keeps the main transaction size within limits.
You can perform this pre-mint action directly from the admin dashboard on the listing modal. If you encounter the “Transaction Too Large” error, try running this pre-mint step first.
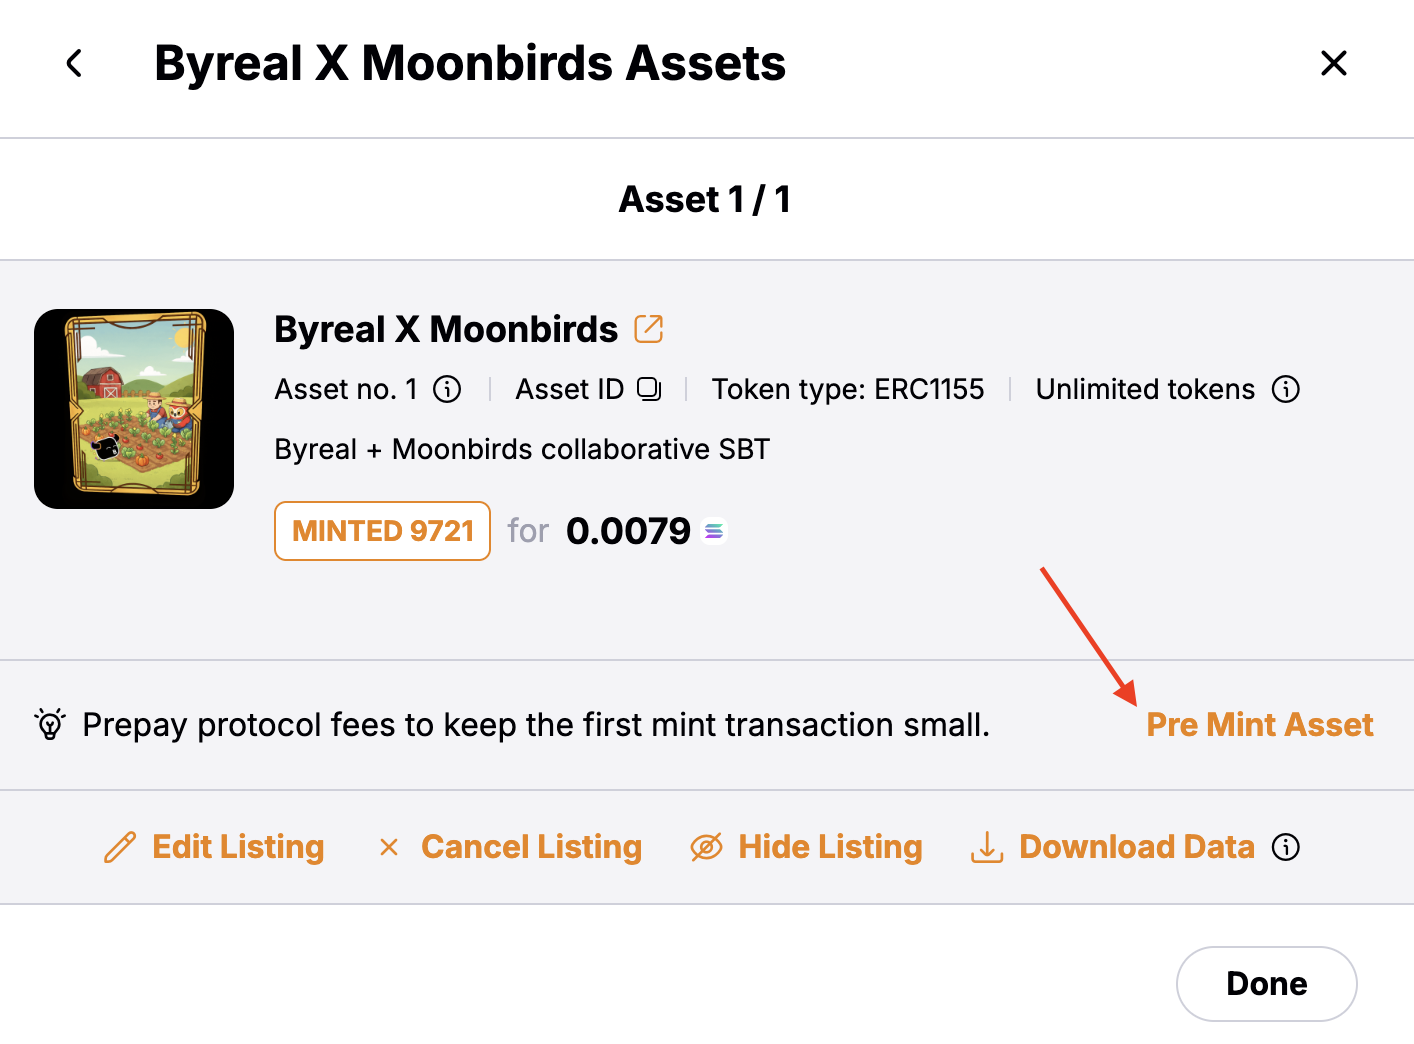 This pre-mint action currently lacks a specific success message or loading indicator in the UI. It does not count towards the visible mint count (which may still show 0), even though 1 quantity is minted on-chain.
 - Wallet Initialization: For the payment recipient wallet, we send a small amount of the required currency (e.g., USDC or SOL) to initialize the account. This ensures the fee recipient address is ready to receive mint payments.
Common Errors
If account initialization is not handled correctly, you may encounter the following errors: Transaction Simulation FailedRelated pages
Badges
Create achievement badges to gamify your loyalty program.
Stratus Relayers
Enable gasless minting with managed private keys.
Loyalty Overview
Set up the loyalty program that powers your rewards shop.
Page Builder
Build custom pages to showcase your collections and rewards.